Let me get straight to the point.
This cake is heavenly.
The chocolate cake layers are incredibly moist, and the filling is so creamy and light, you almost feel nothing at all.
I think this cake makes a wonderful gift for any occasion.
I baked mine for my mom's birthday a few months ago, and everyone absolutely ADORED it.
Especially because it was baked in a 7-inch pan, it was perfect for a 'leftovers-free' birthday cake! My mom hates having large cakes and pies in the refrigerator because it takes up so much space, so she always tries to slice'em up and store them in a small container.
But I hate doing that, because if I store it that way, the cake gets all out of shape and it loses so much frosting in the process of putting it in and out of containers!
That's why I usually bake smaller cakes - so that we can finish it on the spot:)

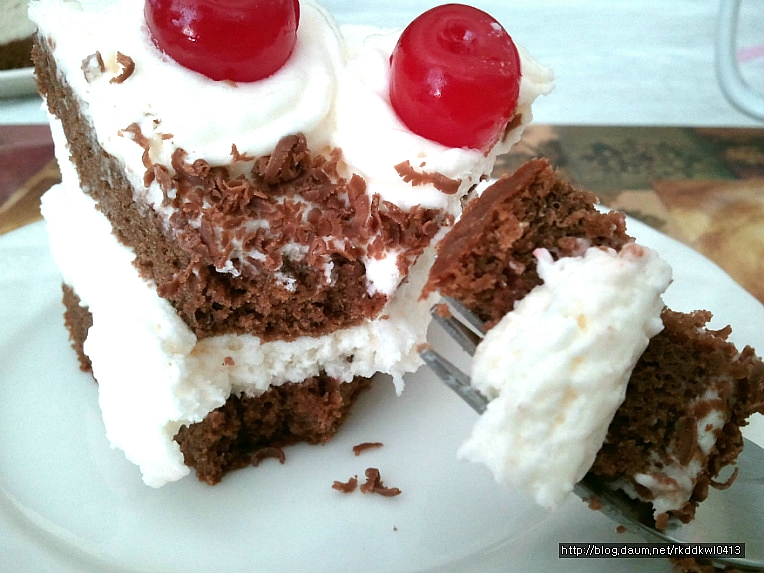


Swiss Black Forest Cake
Recipe adapted from hotpolkadot
Makes one 7-inch cake
Ingredients:
For the Cake:
3 ounces semisweet chocolate, chopped
6 tablespoons boiling water
3 eggs
6 tablespoons granulated sugar
6 tablespoons cake flour (or substitute)
For the filling:
7 g/0.25 oz powdered gelatin
1/4 cup water
3 cup whipped cream (I used cool whip)
3 tbsp granulated sugar
1 1/2 tsp vanilla
1-15 oz can pitted maraschino cherries, drained, syrup reserved
3 tbsp spiced rum
For Garnish:
1 ounce semisweet chocolate, grated or shaved
12 pitted maraschino cherries
Directions:
Preheat the oven to 350 degrees. Butter and flour a 7-inch spring form pan and set it aside.
In a small heavy sauce pan combine the chopped chocolate and water then bring it to a slow boil over low heat, stirring constantly. Remove it from the heat once it thickens to a pudding consistency and stirring leaves temporary lines in the surface. Set it aside and let it cool to room temperature.
In a large bowl with an electric mixer and the whisk attachment beat the eggs and sugar until they triple in volume. Gently but quickly fold in the cake flour half at a time until it's just incorporated. Next fold in the cooled chocolate mixture.
Pour the batter into the pan and bake for 23 - 28 minutes until a toothpick inserted into the middle comes out clean. The top of the cake will rise while baking then lower slightly when it's done and feel springy to the touch. The sides will also shrink as they pull away from the pan.
Transfer the pan to a cooling rack and allow it to sit for 10 – 15 minutes before releasing the cake from the spring form to cool completely.
While the cake is cooling, make the filling. In a medium bowl combine whipped cream and sugar. In a small heatproof bowl combine the gelatin and water. Let it soften for about 5 minutes then place the bowl in a pan of simmering water, stirring occasionally, until the gelatin is dissolved. Set the gelatin mixture aside and let it reach room temperature, then add it slowly to the whipped cream. Stir in vanilla extract.
Drain the can of cherries and reserve the syrup. Set aside 12 cherries to top the cake later. With a cake leveller or a long serrated knife level off the top of the cooled Chocolate Génoise Cake and slice it into 2 even layers and put one into a mousse ring/springform pan, or wrap it around with parchment paper. In a small bowl combine the reserved cherry syrup and spiced rum then drizzle it evenly over each cake layer. Spoon in 3/4 of the filling and push in the drained cherries. Top with the remaining cake layer and spread half of the remaining filling over it. Pipe rosettes around the cake with a piping bag and top each with a cherry. You can keep the stems on if you'd like, but I didn't have enough pretty cherries with stems, so I just took them all out:)