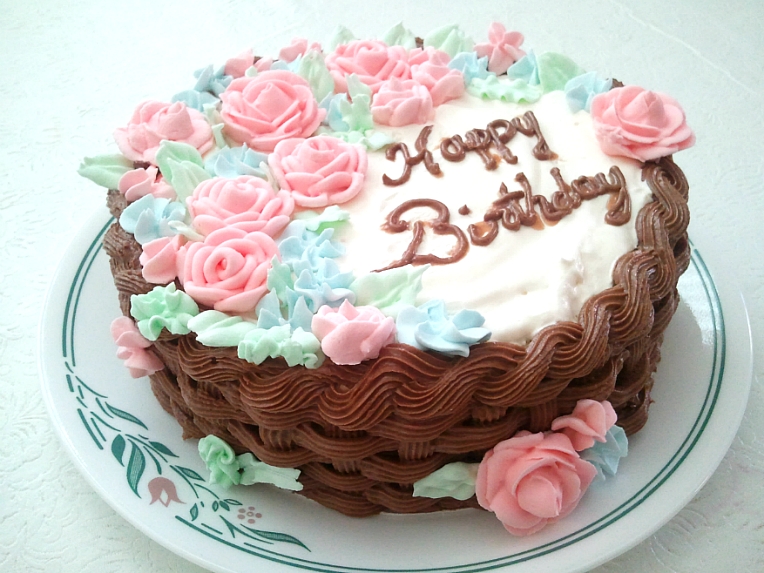
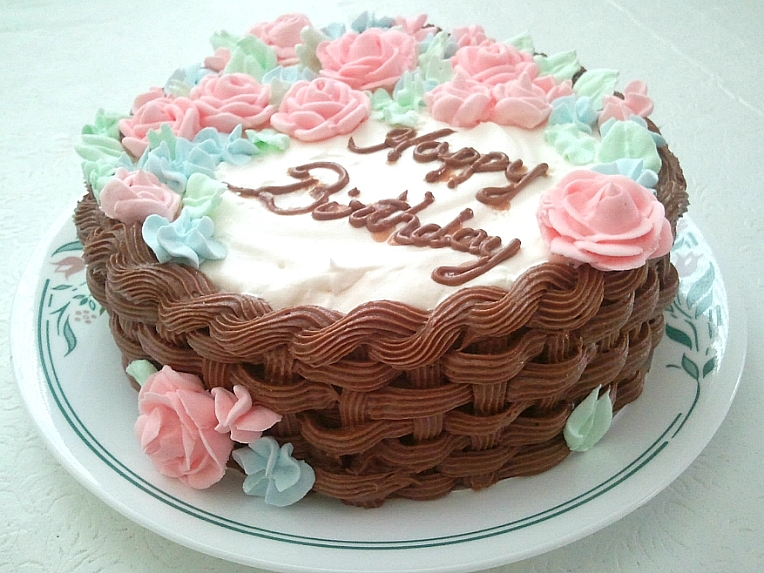
Showing posts with label recipe. Show all posts

Monday, March 19, 2012

Super Moist Honey Cake


Here's a super moist cake for you all.
It's actually a quick bread, but it is extra moist and tender, almost like a cupcake:)
As soon as I saw this recipe, I knew I had to make it.
It's not the prettiest thing in the world, but I can tell you that you'll want to bake it over and over again!
Basically, it's a spice cake, but with a surprise of a distinctive honey flavor.
The honey taste is definitely there, which is perfect for me because I adore honey.
I was planning to have these with a drizzle of honey, but I don't even think that was necessary!
These are perfect for breakfast, a quick snack, or even as a dessert.


Super Moist Honey Cake
makes one 9x5" loaf
Recipe adapted from SmittenKitchen
Ingredients*
1 cup plus 2 1/2 tablespoons all purpose flour
1 teaspoon baking powder
1/3 teaspoon baking soda
1/6 teaspoon salt
2 teaspoons cinnamon
1/6 teaspoon ground cloves
1/6 teaspoons ground nutmeg
1/3 cup olive oil
1/3 cup honey
1/2 cup granulated sugar
1/6 cup (2 tablespoons plus 2 teaspoons) brown sugar
1 egg, room temperature
1/3 teaspoon vanilla extract
1/3 cup warm coffee
1/6 cup (2 tablespoons plus 2 teaspoons) fresh orange juice
1 tablespoon plus 1 teaspoon rye or whiskey ( I just used water - worked fine!)

Directions:
Preheat oven to 350F.
Generously grease 9x5" loaf pan with baking spray.
In a medium bowl, combine the flour, baking powder, baking soda, salt, cinnamon, cloves and nutmeg. Make a well in the center and add oil, honey, both the sugars, eggs, vanilla, coffee, orange juice, and ryr or whiskey (or water). I have learnt from this recipe that if you meaure the oil first, then the honey, the honey will slide out beautifully without leaving any sticky bits behind! With an electric mixer on low speed, stir together all the ingredients until well combined. Pour batter into the prepared pan. Bake until the cake springs back when you gently touch the center, about 45 to 55 minutes. Let the cake stand for 15 minutes before removing from pan.

*I know the ingredients measurements are a little strange, and that's because I divided the original recipe by three! If you want to, you can bake 3 loaves with the following amounts:
3 1/2 cups all purpose flour
1 tablespoon baking powder
1 teaspoon baking soda
1/2 teaspoon salt
4 teaspoons cinnamon
1/2 teaspoon ground cloves
1/2 teaspoon ground nutmeg
1 cup olive oil
1 cup honey
1 1/2 cups granulated sugar
1/2 cup brown sugar
3 eggs, room temperature
1 teaspoon vanilla extract
1/2 cup fresh orange juice
1/4 cup rye or whiskey


Sunday, March 18, 2012

Giant Chocolate Chip Cookies


What makes an ordinary chocolate chip cookie extra special?
I think it's the size.
Chocolate chip cookies are a classic favorite for all those cookie-lovers, but you have to admit: they can get a little boring sometimes. 
NOT that I would ever say no to anyone who offers me one. :)
But a little twist and a little surprise are always fun to find in those little babies.
Or in this case, HUGE babies!
These are actually white chocolate macadamia cookies, but you can omit the nuts and just use semi-sweet or milk chocolate chips if you'd like. It's pretty easy to adjust to your taste.
The one thing you MUST follow, of course, is the extra special size! 
(They are about 5" in diameter)
The edges are perfectly crisp, the center is soft, moist, and chewy, and every bite has a satisfying crunch from the nuts, and an irresistible, smooth, meltiness from the chocolate chips.
I guarantee that this perfectly sweet treats will be a "big" hit among the kids!


Giant Chocolate Chip Cookies
makes 8 (5-inch) cookies
Recipe adapted from Martha Stewart
Ingredients:
1 cup all purpose flour, spooned and leveled
3/4 teaspoons baking soda
1/2 teaspoon salt
1/2 cup unsalted butter
1/2 cup granulated sugar
6 tablespoons packed light brown sugar
1 egg
1 teaspoon vanilla extract
1/4 cup chocolate chips
1/4 cup chopped macadamia nuts

Directions:
Preheat oven to 375F. Line a cookie sheet with parchment paper.
In a medium bowl, whisk flour, baking soda, and salt. Set aside.
In a large bowl, with an electric mixer fitted with the paddle attachment, beat butter and sugars until light and fluffy. Add egg and beat well. Mix in vanilla.
Reduce speed to low and add in flour mixture; mix until just combined. Stir in the chocolate chips and nuts.
Drop by 1/4 cupfuls onto the cookie sheet, at least 4-inches apart from eachother. Bake until golden, 15 to 18 minutes. Cool 1 or 2 minutes on cookie sheets before transferring the cookies to a wire rack to cool completely.


See how wonderfully huge that is?


I made half the recipe and got four cookies - perfect for my family!
And yes, I used half an egg.


What's your way of making cookies special?


Thursday, March 15, 2012

The Best Red Velvet Cheesecake Cake ever.


I guess the red velvet trend is starting to die out now, but red velvet is still unquestionably many people's favorite flavor.
I'm not so sure that I would be able to recognize the taste of red velvet in a blind taste testing; maybe it's just the color that makes it alluring to our taste buds, as well as our eyes.
But seriously, there's like twenty red velvet recipes in my "to try" list because they all looked so tempting!
Red velvet whoopie pies, red velvet cookies, red velvet cupcakes, red velvet cake balls... you name it!
This one was the only recipe I've tried so far, and it's definitely an good start!
No, it's actually an AMAZING start.
A whole layer of rich and creamy cheesecake stuffed inside two moist, thick, and delicious layers of red velvet cake.
Covered with decadent cream cheese frosting.
Topped with shavings of white chocolate love.

Mmm... what more could you ask for?


Red Velvet Cheesecake Cake
recipe adapted from recipegirl

Makes one amazing 9-inch 3-layer cake
Ingredients:
For the Cheesecake:
Two (8-ounce) packages cream cheese, at room temperature
2/3 cup granulated white sugar
pinch of salt
2 large eggs
1/3 cup sour cream
1/3 cup heavy whipping cream
1 teaspoon vanilla extract

For the Red Velvet Cake:
2 1/2 cups all purpose flour
1 1/2 cups granulated white sugar
3 tablespoons unsweetened cocoa powder (not Dutch process)
1 1/2 teaspoons baking soda
1 teaspoon salt
2 large eggs, at room temperature
1 cup melted butter
1/2 cup vegetable or canola oil
1 cup buttermilk
1/4 cup (two 1-ounce bottles) red food coloring
2 teaspoons vanilla extract
2 teaspoons white vinegar

For the Cream Cheese Frosting:
1 cup powdered sugar, sifted lightly to remove any lumps
Two (8-ounce) packages cream cheese, at room temperature
1/2 cup unsalted butter, at room temperature
1 tablespoon vanilla extract

Directions:
1. Prepare the cheesecake layer: Preheat oven to 325 degrees F. Place a large roasting pan on the lower third rack of the oven. Place a kettle of water on the stove to boil. Spray a 9-inch springform pan with nonstick spray and line the bottom with a round of parchment paper. Wrap a double layer of foil around the bottom and up the sides of the pan (you want to seal it so the water from the water bath doesn't seep into the pan). In a large bowl, use an electric mixer to mix the cream cheese- blend until it is nice and smooth and creamy. Mix in sugar and salt and blend for 2 minutes, scraping down sides of the bowl as needed. Add eggs, one at a time, blending after each addition. Finally, mix in sour cream, whipping cream and vanilla. Mix until smooth. Pour the batter into the prepared pan. Set the pan into the roasting pan in the pre-heated oven. Carefully pour the hot water from your kettle into the roasting pan (it will fill the pan surrounding the cheesecake). Pour enough water so that there is about an inch of water coming up the foil along the sides of the cheesecake pan. Bake the cheesecake for 45 minutes. It should be set to the touch and not jiggly. Remove the cheesecake from the roasting pan and let it cool on a wire rack for at least an hour. When it has cooled, place the pan into the freezer and let the cheesecake freeze completely. This can be done in several hours- or overnight.

2. Prepare the cake layers: Preheat oven to 350 degrees F. Grease and flour two 9-inch round metal baking pans (or spray with nonstick baking spray with flour). In a large bowl, whisk together flour, sugar, cocoa powder, baking soda and salt. Add eggs, melted butter, oil, buttermilk, food coloring, vanilla and vinegar to the flour mixture. Using an electric mixer on medium-low speed, beat for 1 minute, until blended. Scrape sides and bottom of bowl with a rubber spatula. Beat on high speed for 2 minutes. Spread the batter evenly into the prepared pans, dividing equally. Bake 25 to 30 minutes or until a toothpick inserted in the center comes out with a few moist crumbs attached. Let cool in pans on a wire rack for 10 minutes. Run a knife around the edge of the pans, then invert cakes onto a rack to cool completely.

3. Prepare the frosting: In a large bowl, using an electric mixer on medium-high speed, beat powdered sugar, cream cheese, butter and vanilla until it is smooth and creamy (do not overbeat).

4. Assemble the cake: Place one cake layer into the center of a cake plate or platter. Remove the cheesecake from the freezer, take off the sides of the pan, and slide a knife under the parchment to remove the cheesecake from the pan. Peel off the parchment. Measure your cheesecake layer against the cake layers. If the cheesecake layer turns out to be a slightly larger round than your cake, move it to a cutting board and gently shave off some of the exterior of the cheesecake to get it to the same size as your cake layers. Place the cheesecake layer on top of the first cake layer. Place the 2nd cake layer on top of the cheesecake.

5. Frost the cake: Apply a crumb coat layer to the cake- use a long, thin spatula to cover the cake completely with a thin and even layer of frosting. Be sure to wipe off your spatula each time you are about to dip it back into the bowl to get more frosting (this way you won't be transferring any red crumbs into the bowl of frosting). Don't worry at this point about the crumbs being visible in the frosting on the cake. When your cake has a thin layer of frosting all over it, place it into the refrigerator for 30 minutes to "set" the frosting. Once the first layer of frosting is set, apply the 2nd layer. Start by adding a large scoop of frosting onto the top of the cake. Use a long, thin spatula to spread the frosting evenly across the top and then spread it down the sides of the cake too. Because you applied a crumb-coat layer, you shouldn't have any red crumbs floating around in the final frosting layer. Decorate, as desired. I recommend white chocolate shavings (see *Tips below). Keep this cake refrigerated.

Tips:
*For making white chocolate shavings: Purchase a hunk of white chocolate. Microwave the chocolate to soften it up slightly (15 to 30 seconds, depending on the size). Use a potato peeler to run down the side of the chocolate to create shards/shaves/curls of white chocolate. I like to shave it onto a paper plater and then just use the plate to slide the chocolate onto the top of the cake.
*If you are serving this cake at a party, it's perfectly okay to leave the cake at room temperature for an hour or so while serving. Otherwise, keep it in the refrigerator. It also freezes perfectly! I made my cake one day and then just placed it as-is in the freezer and pulled it out the next day. It thaws quickly.
*The original recipe uses 2 1/2 cups powdered sugar for the frosting, but my family doesn't like crazy sweet stuff, so I reduced the amount drastically. 1 cup was still very sweet for us!


Tuesday, March 13, 2012

Super moist banana snack cake


I don't usually make the same recipe more than once, because I like variety, but this is one of the very, very, few recipes that I call my "go-to" recipe. 
These are bomb.
They are the most tender banana breads you will ever have.
So tender that I called it a cake rather than a bread.
They have a wonderful, deep banana flavor, and literally, they MELT IN YOUR MOUTH.
Oh, and you wanna know something even better?
They freeze beautifully.
Simply wrap each piece in plastic wrap, freeze 'em, and thaw in the refrigerator when you feel like snacking! 
20 seconds in the microwave is all it takes for a "freshly baked" banana cake :)


Super Moist Banana Snack Cake
recipe from Cooking light
serves 12
Ingredients:
6 3/4 oz all-purpose flour (about 1 1/2 cups - spooned and leveled)
1/3 cup sugar
1 tsp baking powder
1 tsp baking soda
1 tsp ground cinnamon
1/4 tsp salt
1 cup plain low-fat yogurt
3/4 cup mashed ripe banana (about 1 1/2 medium bananas)
1/4 cup vegetable oil (I used safflower)
1 large egg, lightly beaten.
cooking spray
1/2 cup cool whip (optional)

Directions:
Preheat oven to 375F.
Combine flour, sugar, baking powder, baking soda, cinnamon, and salt in a large bowl; stir with a whisk.
In a small bowl, combine yogurt, banana, oil, vanilla and egg; stir until well blended. Add yogurt mixture to the flour mixture in the large bowl, stirring just until moist.
Pour the batter into a 9-inch square metal baking pan coated with cooking spray. Bake at 375F for 15-20 minutes or until a wooden pick inserted in the center comes out clean. Cool cake in the pan 10 minutes on wire rack; remove from pan. Cool completely on wire rack. Serve with whipped topping, if desired. (Since the cake was so moist and tender, I found that it didn't even need a topping!)


See how tender that is?


Saturday, November 5, 2011

Benedict Rancheros


Mmm.. Mexican.. yum...:)))
Okay, so I love Mexican food, cilantro, and beans.
I was at costco, strolling along the aisles, and then I spotted a whole pack of canned black beans!
I picked it up immediately without hesitation.
....what was I thinking??
They've been in my pantry for like, 9 months now. 
My original plan was to use a can of beans once a week for 8 weeks, but those cans just ended up sitting there, forgotten.
Two of them were donated at the canned food drive last week, one of them was used for pasta, and the rest were simply heated and eaten by... me!
Of course, I still have a few cans left... and I don't think I would ever buy them in bulk again!
So anyway, this was something I made to clean my pantry, to be honest.
My family is usually not crazy about beans, but they all loved this dish!
Just smuggling in some good ol' beans for my family:) 
They ARE meant to be good for you, right?


Benedict Rancheros
serves 2
Recipe adapted from Epicurious
Ingredients:
1 jalapeno
1 tsp olive oil
1 small onion, chopped
1 clove garlic, chopped
1/2 tsp cumin
1 cup crushed tomatoes with juice
1/2 cup water, plus more as needed
2 eggs
black pepper & sea salt
1 Tbsp finely chopped cilantro*
1/2 cup canned black beans, drained
1/2 cup water
2 corn muffins (recipe below)

Directions:
Cut jalapeno in half lengthwise. Scrape the seeds and reserve them for later use, and finely chop the flesh.
Heat oil on a skillet over medium heat and cook the jalapeno, onion, garlic, and cumin for 4-6 minutes.
Add the tomatoes and 1/2 cup water, bring to a boil, then simmer over medium low heat until it becomes a sauce-like consistency.**
Poach the eggs and keep warm in 120F water.
Taste the sauce, season, and add the reserved jalapeno seeds if you want it spicier. (I didn't add the seeds, and it was  mild to medium spicy). Stir in the cilantro, cover, and remove from heat.
Pour the beans and water into another skillet over medium heat, mash with a fork, then cook until thickened, about 3-4 minutes. Add water as needed.
Cut the rounded tops of the corn muffins and cut the bottom in half horizontally. Toast under a broiler, cut side up, until golden brown. Put the muffin on a serving plate, spread the beans, top with a poached egg, then the vegetable tomato mixture. Garnish with cilantro, if desired.

Notes:
*I forgot to stir in the cilantro in the salsa, so I simply used it as a garnish at the very end!
**I had to simmer for a LONG time until it thickened even the slightest bit. The tomatoes were very watery:( I would use just 1/4 cup of water next time.

Corn Muffins:
Recipe adapted from Betty Crocker's New Cookbook
Ingredients:
3/4 cup yellow cornmeal
1/4 cup all purpose flour
3/4 cup buttermilk
2 tbsp vegetable oil or shortening
1/2 tsp sugar
1/2 tsp salt
1/4 tsp baking soda
1 large egg

Directions:
Preheat the oven to 450F. Grease the bottom and side of 6 muffin cups with shortening.
Mix all ingredients. Beat vigorously 30 seconds with a wooden spoon. Pour batter into muffin cups.
Bake for 10-15 minutes, until golden brown.

Monday, October 17, 2011

Betty Crocker's Jumbo Chocolate Chip Cookies


I'm trying to get the perfect chocolate chip cookie these days, so I've already tried about four different recipes just last week. 
One of them was the turtle cookies I posted a few hours ago, which was awesome, but that technically wasn't a chocolate chip cookie, and they had nuts in them.
This one's more of a pure, classic version:)
Of course, they're huge, soft, thick, moist, and chewy - just how I like'em!
I usually try to underbake my cookies so that there's a little cookie doughy bit inside:)))
And these cookies certainly gave me that!


Jumbo Chocolate Chip Cookies
makes 1 1/2 dozen 5-inch cookies
Recipe from Betty Crocker's New Cookbook
Ingredients:
3/4 cup granulated sugar
3/4 cup packed brown sugar*
1 cup butter, softened
1 egg
2 1/4 cups all purpose flour**
1 teaspoon baking soda
1/2 teaspoon salt
2 cups semisweet chocolate chips

Directions:
Preheat oven to 375F.
Mix sugars, butter, and egg in a large bowl. Stir in the flour, baking soda and salt.
Stir in the chocolate chips. Drop dough by 1/4 cupfuls onto an ungreased cookie sheet, leaving 3 inches between cookies.
Bake 12 to 15 minutes or until edges are set but the center is still soft. Let the cookies cool for about 2 minutes on the cookie sheet, then transfer to wire racks and cool completely.

Notes:
*I used splenda brown sugar blend, just to make it a little healthier:)
**I used 2 1/4 cups of self rising flour and omitted the baking soda and salt.
For regular sized cookies, drop by heaping tablespoons about 2 inches apart and bake for 8 to 10 minutes. Makes about 4 dozen.


Asian Chicken with Peanuts


Chicken is officially my favorite meat.
Well, they're poultry, not exactly 'meat'. So let's say.. favorite protein?
No, wait. Beans are better.
Okay, chicken is my favorite animal to eat... that sounds weird, doesn't it?
Forget it. I just like chicken.
They're so versatile and easy to prepare in a snap. Plus, they're healthy!
I don't know how many people are like me, but I like the taste of healthy food. I usually eat the chicken breasts rather than the wings or drumsticks.
And I love munching down a big bowl of chunky vegetables.
It makes me feel so... pure and organic:)
But at the same time, I love chocolatey, buttery, fudgy desserts, so I guess that evens it out.


Asian Chicken with Peanuts
serves 4 (2 cups each)
Recipe adapted from Campbell's Kitchen
Ingredients:
2 tablespoons cornstarch
1 3/4 cups less sodium chicken broth
2 tablespoons soy sauce
1/2 teaspoon ground ginger
1/2 teaspoon sesame oil (optional)
2 tablespoons vegetable oil
1 1/4 lb skinless, boneless chicken breast halves, cut into 2 inch strips (2 cups)
2 teaspoons chopped garlic
2 cups broccoli
2 small red peppers, cut into 2-inch strips (2 cups)
1/2 cup salted peanuts*
2 tablespoons chunky or creamy peanut butter (optional)**
1 cup long grain white rice, cooked (3 cups cooked)

Directions:
Stir cornstarch, broth, soy sauce, ginger, sesame oil in a medium bowl.
Heat 1 tablespoon oil in a 12-inch skillet over medium high heat and stir fry chicken until well browned. Remove the chicken from the skillet and keep warm.
Reduce heat to medium, heat 1 tablespoon oil, and add broccoli, pepper, and garlic and stir fry until tender crisp. Stir in the cornstarch mixture; cook and stir until it boils and thickens, then stir in the peanut butter. Return chicken to skillet.
Stir in peanuts and season with salt to taste. Cook until hot and bubbling.
Serve with cooked rice.

Notes:
*I didn't have salted peanuts, so I used regular peanuts and added about 1/2 teaspoon salt.
**The original recipe doesn't include peanut butter, but I felt that the end result didn't really pick up the peanutty flavor from just the salted peanuts.


Ooey Gooey Peanut Butter Chocolate Chip Bars


How about that, eh? Ooey and gooey. And chewy.
I made these for my dad and his golf friends, since they always skip lunch when they go golfing.
I had less than an hour left until my dad had to go, so I made these in a real hurry. 
Notice that they are quite underbaked. Problem? Nah.
They didn't even get to cool down before getting packed, which meant EXTRA gooey:)
These are the BEST peanut butter chocolate chip bar cookies I've ever made!
They have a slight crackling top, and the interior is very soft and moist. 
Every bite gives you a huge chunk of oozing chocolate and a killing smell of warm peanut butter.
I'll probably make these again... and again...and again... 
until I become a big, fat chocolate chip.


Peanut Butter Chocolate Chip Bars
Makes 16 bars
Recipe adapted from Bakeat350
Ingredients:
6 tablespoons unsalted  butter
1/2 cup peanut butter
1 cup sugar
1/4 cups light brown sugar, packed
2 eggs
1 teaspoon vanilla extract
1 cup all purpose flour
1/4 teaspoon coarse salt
1 teaspoon baking powder
1 cup semisweet chocolate chips

Directions:
Preheat oven to 350F. Line an 8x8" square pan with aluminum foil.
Whisk together the flour, salt, and baking powder. Set aside.
Cream the butter and peanut butter together until smooth. Beat in both the sugars until combined.
Add the eggs, one at a time, mixing well after each addition. Make sure you scrape down the sides of the bowl.
Stir in the vanilla; stir in the flour mixture. Add the chocolate chips and mix until just combined.
Spread the batter into the prepared pan. Bake about 40 minutes. Cool completely; cut into 16 squares.


Sunday, October 16, 2011

Caramel Turtle Cookies


I love chocolate chip cookies. That's an undeniable, solid fact.
I baked big, fat chocolate chip cookies three days in a row last week, all of which I have gobbled up after lunch (and dinner... and umm.. breakfast too). 
But I don't like just any old chocolate chip cookie..
Wait, let me fix that. I like any chocolate chip cookies, but I don't fall in LLLOVE with all of them.
There are lots of things to consider when you're choosing THE ONE.
Crunchy vs. Soft
Thick vs. Thin
Chewy vs. Cakey
Crisp vs. Ooey Gooey
Chocolate chunks vs. Specks of mini chocolate chips
Nuts vs. No nuts
....
...
...
I could go on forever, but my criteria is simple.
1. Soft, but not cakey
2. Loaded with chocolate chips
3. Thick
4. No nuts
That's all I ask for.
How come none of my chocolate chips turn out that way? It's so frustrating.
These caramel turtle cookies are a little twist to chocolate chip cookies, because I added some caramel bits and nuts to it.
I know, I know, I hate nuts in cookies, but these were requested by my mom, who loves anything with nuts in them, so I reluctantly grabbed a bag of some forgotten macadamia nuts and poured them into my precious cookie dough.
And surprisingly, they were perfect! Even the nuts gave them a great flavor and a nice crunch. I think I didn't mind the nuts because the tops of these cookies were crackly and crunchy anyways.
The inside is soft though, so I munch-munched until I realized it was 11pm. 
Hmm... I'll walk 10 miles tomorrow.


Caramel Turtle Cookies

Makes 1 dozen 5-inch cookies
Recipe adapted from My baking addiction
Ingredients:
1 cup minus 1 tablespoon cake flour
5/6 cup bread flour (1/2 cup plus 1/3 cup)
1/2 teaspoon baking soda
3/4 teaspoon baking powder
3/4 teaspoon salt
10 tablespoons unsalted butter
1/2 cup light brown sugar
1/2 cup granulated sugar
1 egg
1 teaspoon vanilla extract
1 cup bittersweet chocolate chips
1/2 cup caramel bits (I used Kraft)
1/2 cup chopped macadamia nuts

Directions:
Preheat oven to 350F. Line two cookie sheets with parchment paper.
Combine both flours, baking soda, baking powder and salt into a medium bowl. Set aside.
In a mixer fitted with a paddle attachment, cream butter and sugar until very light, about 5 minutes. Add the egg and mix well. Stir in the vanilla. Reduce the speed to low, add the dry ingredients and mix until just combined. Mix in the chocolate chips, caramel bits, and chopped nuts.
Using a regular ice cream scoop, scoop a generous amount of dough and place on the cookie sheets. I got 9 on one of them and 3 on the other.
Bake until golden brown but still soft, about 18-20 minutes. You might want to switch the two cookie sheets  during baking for even browning. I didn't, so 9 of them were golden brown while 3 of them were a tad bit pale:( Cool completely on a wire rack, then store in an airtight container.

Notes:
For smaller cookies, you can use a heaping tablespoon instead of an ice cream scoop, and bake for 12 minutes.


Saturday, October 15, 2011

Golden Pecan Pie (Pecan Tart)


Here comes Christmas holidays!
It feels great to look out the window and see all the decorations that my neighbors have put up on their houses.
It makes me feel all warm and cozy:))
I know it's not Christmas yet, and it's not the holidays yet either, but I wanted to celebrate the first of December with something holiday-ey!
I've never made a pecan pie before, but I've always wanted to try one, so I whipped up my favorite pie crust recipe and filled it with sweet, gooey, crunchy, nutty, indulgent pecan filling... YUM!
I had a problem with some filling being left over, but that's probably because I used a tart pan instead of a pie pan(which I sadly didn't have). But no worries! I simply baked the rest in some crushed graham crackers and called it an individual pecan pie:)


Golden Pecan Pie (Pecan Tart)
makes one 9-inch pie
Recipe from Pillsbury: Best Desserts
Ingredients:
For the Crust:
1 cup all purpose flour
1/2 teaspoon salt
1/3 cup cold shortening
2 to 4 tablespoons ice water
For the Filling:
1/3 cup firmly packed brown sugar
1 1/2 teaspoons all purpose flour
1 1/4 cups light corn syrup*
1 teaspoons vanilla extract
3 eggs
1 1/2 cup pecan halves
2 tablespoon margarine or butter, melted

Directions:
For the Crust:
In a medium bowl, combine flour and salt; mix well. With a pastry blender or two knives, cut in the cold shortening until it resembles coarse crumbs. Sprinkle with 1 tablespoon of ice water at a time, mixing lightly with a fork. Add water until the dough is just moist enough to form a ball when lightly pressed together. Shape into a ball and flatten to a 1/2-inch thickness. On a floured surface, roll into a 11-inch circle, using gentle, light strokes from center to edge. Do not roll back and forth, or else it will become tough! Roll up the circle onto the rolling pin, place it just above the pie pan, and roll it off to place it on the pan. Gently press in the bottom and up the sides with fingertips. Do not stretch. You can trim the edges and use the scraps to fill in any holes.
For the Filling:
Preheat oven to 375F.
In a large bowl, combine brown sugar, flour, corn syrup, vanilla dna eggs; beat well. Stir in pecans and margarine/butter. Pour into pan lined with the crust.
Bake for 40 to 50 minutes or until the filling is puffed and the crust is golden brown. Let it cool completely, then store in the refrigerator.

Notes:
*I found this a little too sweet, so I would reduce the corn syrup to 1/2 cup (8 tablespoons) OR reduce the brown sugar to 1 tablespoon. But then again,  I don't even eat the icing on cupcakes because it's too sweet.


Fresh Blueberry Pie


Yes, it's a pie; not a cobbler.
I made this fresh blueberry pie at 10pm and I didn't want to try it late at night (even though it would have been best as soon as it came out of the oven... all warm and gooey...*sigh*)
So when I heated it in the microwave the next morning, the filling melted completely and made itself a "jam".
Oh, well. It was awesome anyways:)
I'm sure the same thing would have happened if I had it last night... right?

This pie has the perfect amount of sweetness and every mouthful bursts with blueberries.
Honestly, I don't know what would explain it better than that.
OMG just looking at the photos makes me want to have a slice, like, right now.
Too bad I already had two this morning. I should restrain myself!
The crust is nice and flaky, and it is a no-fail recipe, so I highly recommend you try it out!


Fresh Blueberry Pie
makes one 9-inch pie (serves 8-10)
Recipe adapted from Pillsbury Best Desserts
Ingredients:
For the Crust:
2 cups all purpose flour
1 teaspoon salt
2/3 cup cold shortening
5 to 7 tablespoons ice water (I used 7 and it still felt a bit dry - the end result was fab though!)
For the Filling:
3 1/2 cups fresh blueberries
3/4 cup sugar
1/4 cup all purpose flour
1/4 teaspoon cinnamon
2 teaspoons lemon juice
2 tablespoons margarine or butter (I forgot this, but again, turned out gorgeous)
Topping:
1 to 2 tablespoons milk
2 teaspoons sugar
Dash of cinnamon

Directions:
Preheat oven to 425F.
For the Crust:
In a medium bowl, combine flour and salt; mix well. With a pastry blender or two knives, cut in the cold shortening until it resembles coarse crumbs. Sprinkle with 1 tablespoon of ice water at a time, mixing lightly with a fork. Add water until the dough is just moist enough to form a ball when lightly pressed together. Divide the dough into two, shape each into a ball and flatten to a 1/2-inch thickness. On a floured surface, roll them into a 11-inch circle, using gentle, light strokes from center to edge. Do not roll back and forth, or else it will become tough! Roll up the circle onto the rolling pin, place it just above the pie pan, and roll it off to place it on the pan. Gently press in the bottom and up the sides with fingertips. Do not stretch. You can trim the edges and use the scraps to fill in any holes. Roll out the other half of the dough, then use it to top the pie filled with the blueberry filling. You might want to wrap the dough in plastic wrap and keep it in the refrigerator while you prepare the filling.
For the Filling:
In a large bowl, combine all ingredients except the margarine/butter and gently toss to coat evenly. Spoon into the pie pan lined with the bottom crust. Dot with margarine/butter. Top with second crust; seal edges and flute. Cut 4-5 slits to let the steam out; brush with milk, sprinkle with the 2 teaspoons sugar and dash of cinnamon.
Bake at 425F for 45 to 55 minutes or until the crust is golden brown. After 15 minutes of baking, cover the edges with strips of foil to prevent excessive browning.

Sunday, October 9, 2011

Flower Cake with Chocolate Frosting


Tada!
My very first attempt at cake decorating!
I was shy and I always stuck to simple whipped cream when it came to frosting cakes, but I guess it was about time I'd tried something new.
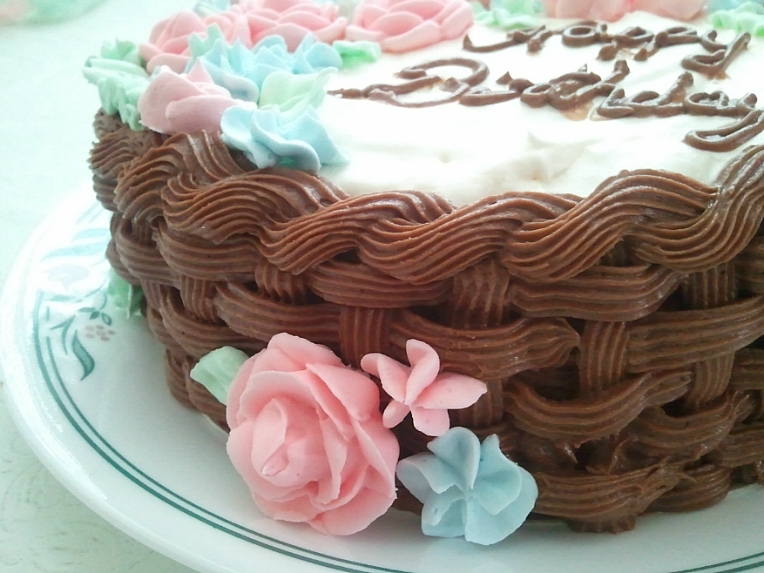
So I made some royal icing and buttercream and used them both on this beautiful flower-covered cake!

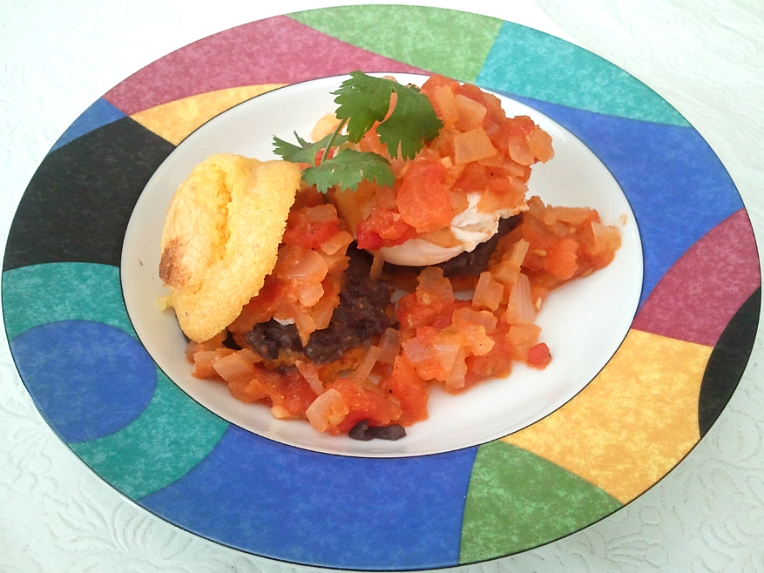
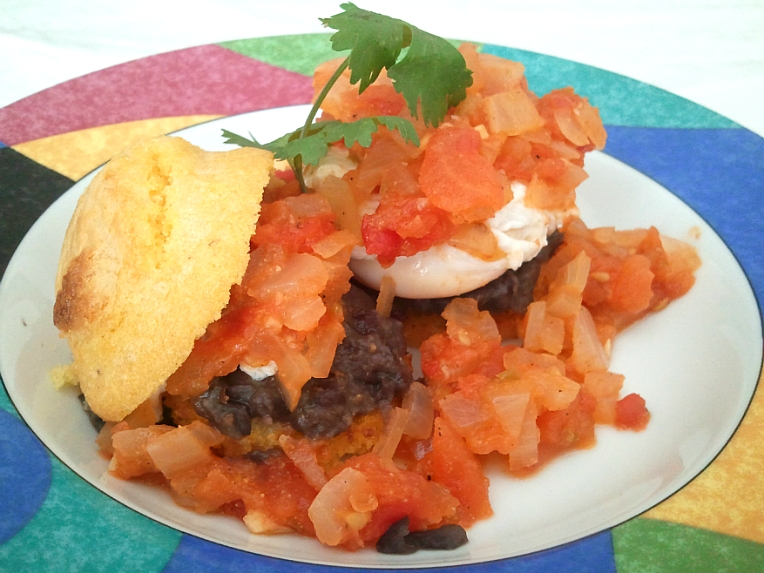
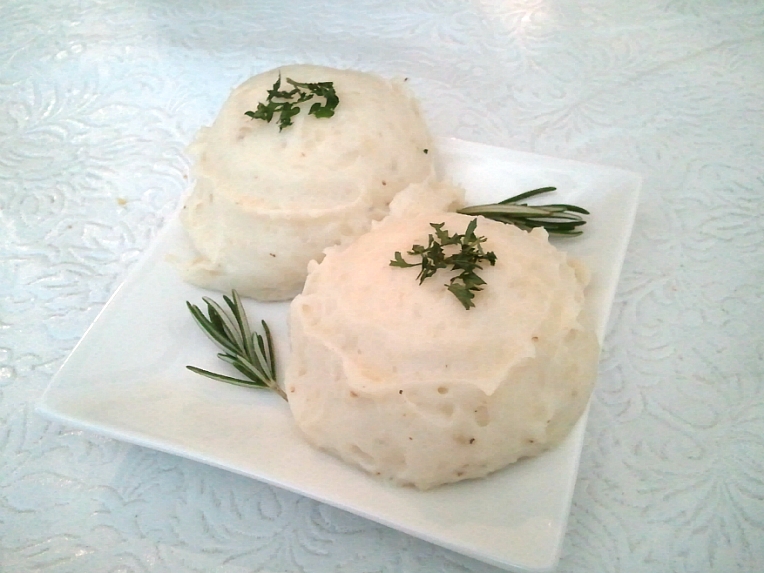
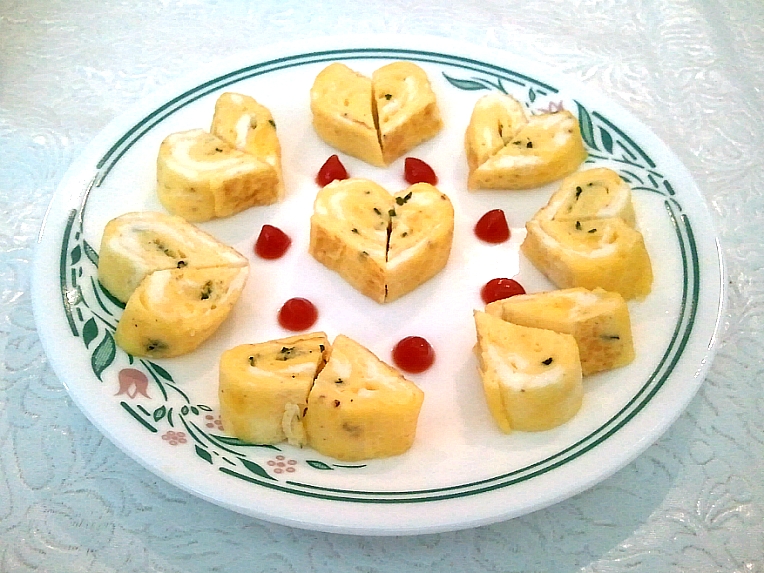
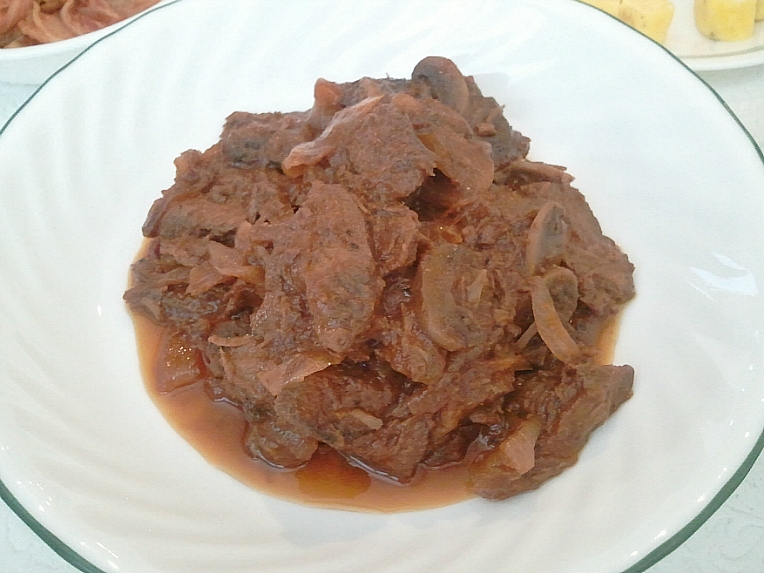
Today was my mom's birthday, so I made a full course dinner for her (well, technically, we had it for breakfast. Yup, at 8am in the morning.) including an appetizer, an entree with two sides, and a dessert :)

So the menu was:
~*~
Appetizer - Korean rolled omelettes
Entree - Braised beef eye of round steak with BBQ sauce
Side - Garlic mashed potatoes
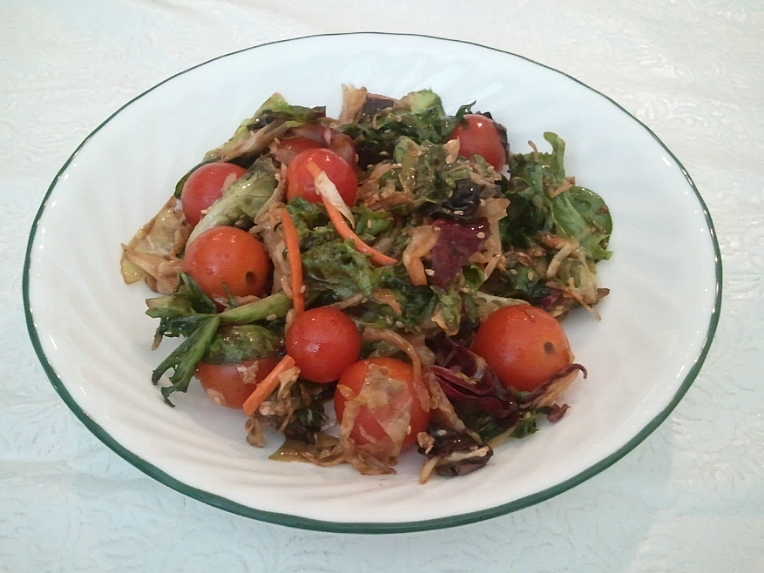
- Oriental salad
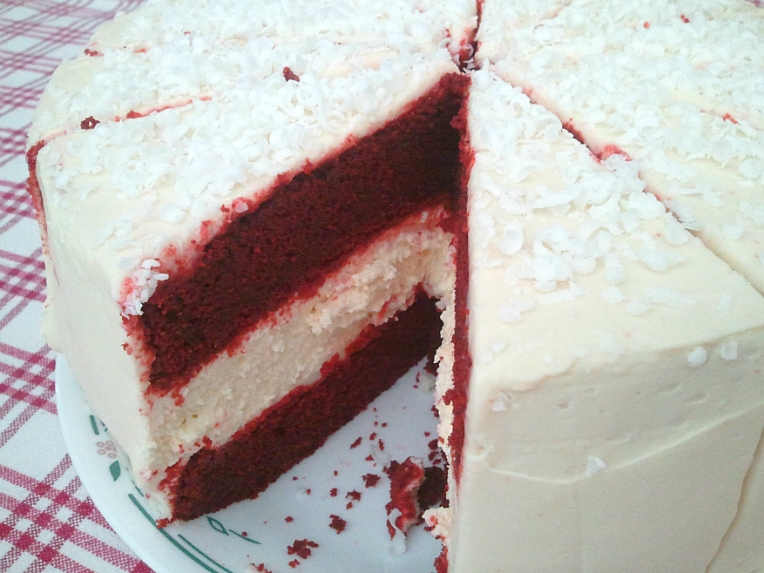
Dessert - Flower cake with chocolate frosting
~*~


Wow... the main dish just looks like a big lump of 'stuff'.
I wasn't too happy with the beef because the sauce turned out a little too sweet, but overall, I was proud of my special gift for my mom:)

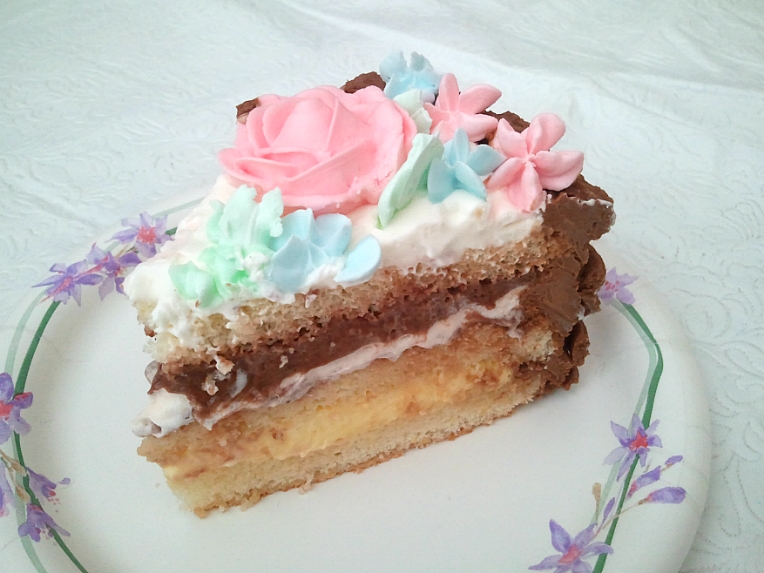
Especially the cake.
OMG, the cake.
It was the best thing on the menu.
Sinfully delicious and divine. That's what it was.
The chocolate buttercream was perfectly creamy and rich, and the cake layers were very moist and tender. 
And the filling was...
Okay, I cheated a little and used pudding mix and cool whip for the filling, but I was so busy cooking and baking yesterday that I just didn't have the time to make bavarian cream.
Anyway, it was a wonderful cake, and the flowers were of just the right sweetness too.
I'm planning to make this cake again for my dad's birthday, but with different decorations!    


Flower Cake with Chocolate Frosting
makes 4-layered 8-inch cake
Recipe adapted from makinglifedelicious(sponge cake) & Wilton(buttercream)
Ingredients:
For the Cake:
5 egg yolks
5 egg whites
1 1/2 cups granulated sugar
1 1/4 cups cake flour, sifted
1 teaspoon vanilla extract

For the Rum Syrup:
1/4 cup water
2 tablespoon light corn syrup
2 tablespoon rum

For the Filling:
1 pkg vanilla instant pudding mix
1 1/4 cups fat free milk
3 tablespoons cool whip

1 pkg chocolate instant pudding mix
1 1/4 cups fat free milk
3 tablespoons cool whip

2 cups cool whip

For the Chocolate Buttercream:
1/3 cup water
2 tablespoons meringue powder
1 (1 lb) box powdered sugar, sifted
10 tablespoons Crisco shortening
2 oz semisweet chocolate, melted
1/3 cup unsweetened cocoa
5 tablespoons light corn syrup
1/2 teaspoon vanilla extract
1/4 teaspoon almond extract
1/4 teaspoon butter flavor
1/4 teaspoon salt

For the Royal Icing:
1 tablespoon meringue powder
1 1/4 cup powdered sugar, measured before sifting
2 tablespoons water
Few drops of food coloring (any color)

Directions:
You might want to make the royal icing flowers several days before making the cake, because they need time to dry.

For the Cake:
Preheat oven to 375F. Grease and flour two 8-inch cake pans.
Beat egg yolks and sugar in a large mixing bowl until lemon colored. (They will look crumbly, like they're never gonna mix, but don't freak out like I did; they will look better later on!) 
In another bowl, beat egg whites until stiff but not dry. Fold half of the egg whites into the egg yolk mixture. Sift flour over the mixture and fold very gently until just incorporated, then add the remaining egg whites and gold, again, until just incorporated. Be very, very gentle, and try to mix them in quickly but thoroughly, until you have no more white streaks.
Pour the batter into the prepared pans and bake in a preheated oven for 20-25 minutes, or until a toothpick inserted in center comes out clean. (I baked them for 22 minutes and the sides came out a little hard)
Remove cakes from the oven and turn out of pans onto wire racks to cool completely.

You can do that, or you can wrap them tightly with plastic wrap when they are warm and put them in the freezer to lock in the moisture. I read about this method in a blog once and I use it whenever I feel like I overbaked the cakes just a tad. Once they cool down, take it out of the freezer and let it become room temperature.

For the Rum Syrup:
I know you're supposed to boil water and sugar first and then add the rum, but I didn't have time for that.
I simply combined water, corn syrup, a splash of rum, and called it a syrup:)

For the Filling:
The ingredients kinda speak for themselves. Mix the vanilla pudding mix with fat free milk, as directed on the box, let it set, then stir in the cool whip. Do the same with the chocolate pudding mix. Refrigerate until use.

For the Chocolate Buttercream:
Combine water and meringue powder. Whip at high speed until peaks form. Sift in 1 cup of powdered sugar into the mixture, 1/2 cup at a time, beating at low speed after each addition. Alternately add shortening and remaining sugar. Add cocoa powder, melted chocolate, and corn syrup. Add salt and flavorings. Beat at low speed until smooth.

To Assemble:
Cut off the tops of each cake to make them flat. Slice them horizontally in half to make four cake layers.
Put one layer in an 8-inch cake ring. Sprinkle with rum syrup. Pipe the chocolate buttercream around the cake with a round or star tip so that the filling doesn't ooze out. Fill in with vanilla filling. 
Top with a second cake layer, sprinkle with rum syrup, pipe a buttercream border, and fill in with cool whip. Reserve some for the very top.
Top with a third cake layer, sprinkle with rum syrup, pipe a buttercream border, and fill in with chocolate filling.
Top with the last cake layer, then spread the top with remaining cool whip. Coat the sides thinly with chocolate buttercream.
Using a basketweave tip (#47), make basketweave designs on the side. Then, using a star tip (#21), make rope borders around the top of the cake. (Click on the links for detailed how-to's.)
Pipe a message on top with the remaining frosting, using a round tip (#3).
My 'Happy Birthday' message kinda soaked into the cool whip and made a smudgy mess; I don't know why that happened.

For the Royal Icing:
Beat all ingredients until icing forms peaks (7-10 minutes at low speed with a heavy-duty mixer, 10-12 minutes at high speed with a hand-held mixer). For stiffer icing, use 1 teaspoon less water. Add 1-2 drops of desired food coloring. Fill a decorating bag with icing and pipe flowers, leaves, whatever you want, on a piece of parchment paper, and let it dry completely for 1-2 days, more if the flowers are big.
Here are the instructions for the roses, star drop flowers, and leaves.
When they become candy-hard, decorate the cake!