Sunday, October 2, 2011

Mini Pistachio Pudding Tartlets


It's October already!
The weather is getting cooler... well, it's supposed to, but here in Arizona, it's still nearly 100 degrees in midday..
So! I was going to make a warm, gooey apple pie to welcome Fall, but it still felt pretty much like summer, so then I decided to make refrigerated mini tartlets:)

This is a very quick and easy dessert to whip up in 10 minutes. 
Okay, maybe not 10 minutes, because you have to bake the crust a bit, but it was the easiest tartlets I'd ever made. Plus, it looks and tastes wonderful! 


Mini Pistachio Pudding Tartlets
Makes 2

Ingredients:
For the Crust:
10 Oreos
1-2 tablespoons milk
For the Filling:
1/2 pkg  jello instant pistachio pudding mix (you can use any flavor you'd like!)
scant 1 cup of cold fat free milk
kiwi, for garnish

Directions:
Preheat oven to 350F.
Remove the cream in the oreos and set aside. Do not throw away the cream. Crush the oreo cookies with the milk in a ziploc bag; press into a 3" mini tart pan. Bake for 10 minutes. Cool on wire rack.
For the filling, combine pudding mix with cold milk and whisk for 2 minutes. Pour into cooled crusts and pop them in the refrigerator.
For garnish, stir the reserved Oreo creams until smooth. Put them in a ziploc bag, cut off the corner, and pipe them into a swirl on the cooled tartlets. Garnish with kiwis.


Monday, September 26, 2011

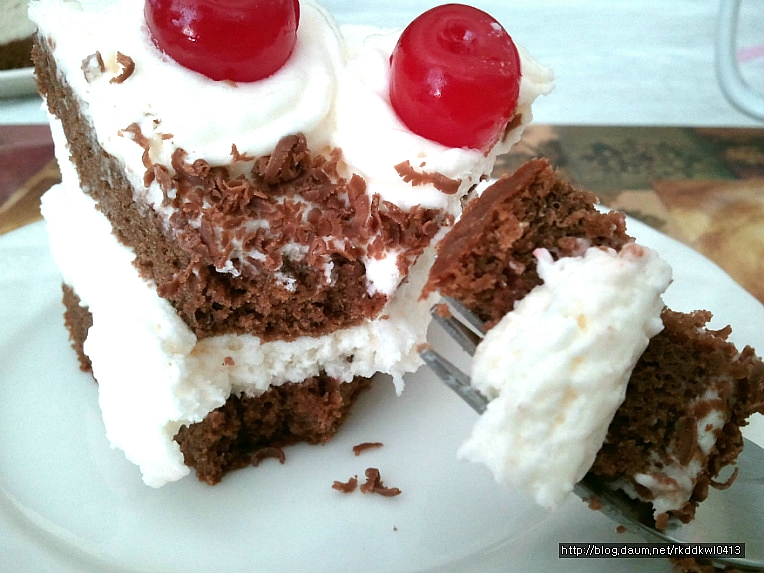
Swiss Black Forest Cake


Let me get straight to the point.
This cake is heavenly.
The chocolate cake layers are incredibly moist, and the filling is so creamy and light, you almost feel nothing at all. 
I think this cake makes a wonderful gift for any occasion.
I baked mine for my mom's birthday a few months ago, and everyone absolutely ADORED it.
Especially because it was baked in a 7-inch pan, it was perfect for a 'leftovers-free' birthday cake! My mom hates having large cakes and pies in the refrigerator because it takes up so much space, so she always tries to slice'em up and store them in a small container.
But I hate doing that, because if I store it that way, the cake gets all out of shape and it loses so much frosting in the process of putting it in and out of containers!
That's why I usually bake smaller cakes - so that we can finish it on the spot:)


Swiss Black Forest Cake
Recipe adapted from hotpolkadot
Makes one 7-inch cake
Ingredients:
For the Cake:
3 ounces semisweet chocolate, chopped
6 tablespoons boiling water
3 eggs
6 tablespoons granulated sugar
6 tablespoons cake flour (or substitute)
For the filling:
7 g/0.25 oz powdered gelatin
1/4 cup water
3 cup whipped cream (I used cool whip)
3 tbsp granulated sugar
1 1/2 tsp vanilla
1-15 oz can pitted maraschino cherries, drained, syrup reserved
3 tbsp spiced rum
For Garnish:
1 ounce semisweet chocolate, grated or shaved
12 pitted maraschino cherries


Directions:

Preheat the oven to 350 degrees. Butter and flour a 7-inch spring form pan and set it aside.
In a small heavy sauce pan combine the chopped chocolate and water then bring it to a slow boil over low heat, stirring constantly. Remove it from the heat once it thickens to a pudding consistency and stirring leaves temporary lines in the surface. Set it aside and let it cool to room temperature.
In a large bowl with an electric mixer and the whisk attachment beat the eggs and sugar until they triple in volume. Gently but quickly fold in the cake flour half at a time until it's just incorporated. Next fold in the cooled chocolate mixture.
Pour the batter into the pan and bake for 23 - 28 minutes until a toothpick inserted into the middle comes out clean. The top of the cake will rise while baking then lower slightly when it's done and feel springy to the touch. The sides will also shrink as they pull away from the pan.
Transfer the pan to a cooling rack and allow it to sit for 10 – 15 minutes before releasing the cake from the spring form to cool completely.
While the cake is cooling, make the filling. In a medium bowl combine whipped cream and sugar. In a small heatproof bowl combine the gelatin and water. Let it soften for about 5 minutes then place the bowl in a pan of simmering water, stirring occasionally, until the gelatin is dissolved. Set the gelatin mixture aside and let it reach room temperature, then add it slowly to the whipped cream. Stir in vanilla extract.
Drain the can of cherries and reserve the syrup. Set aside 12 cherries to top the cake later. With a cake leveller or a long serrated knife level off the top of the cooled Chocolate Génoise Cake and slice it into 2 even layers and put one into a mousse ring/springform pan, or wrap it around with parchment paper. In a small bowl combine the reserved cherry syrup and spiced rum then drizzle it evenly over each cake layer. Spoon in 3/4 of the filling and push in the drained cherries. Top with the remaining cake layer and spread half of the remaining filling over it. Pipe rosettes around the cake with a piping bag and top each with a cherry. You can keep the stems on if you'd like, but I didn't have enough pretty cherries with stems, so I just took them all out:)


Thursday, September 22, 2011

Cranberry Chocolate Chip Biscotti


Biscottis are wonderful complements to a warm cup of coffee or tea.
Well, that's what I heard.
I've never had biscottis before in my life, let alone bake any, so I had no idea what they were supposed to taste like. I usually prefer soft or chewy cookies, rather than hard ones, so I always skipped the biscotti recipes when I looked through cookbooks or websites. 
But I guess it was about time I at least tried some, just to know what it's like.

Not too sweet, but full of flavor, these crunchy little cookies are indeed yummier when they are dunked in warm coffee. The original recipe had white chocolate coating, but I felt that if those were dipped in coffee, they wouldn't really soak up anything, so I threw in some chocolate chips in the batter instead:)
They actually taste wonderful, and I would bake them again soon - probably with a dash of cinnamon to spice'em up!

But umm... I still prefer soft and chewy cookies.


Cranberry Chocolate Chip Biscotti
recipe adapted from cinnamon, spice & everything nice
Makes 5 dozen biscottis
Ingredients:
2 cups all purpose flour
2/3 cup granulated sugar
1/2 tsp baking powder
1/2 tsp baking soda
3 eggs
1 tsp vanilla extract
1/2 cup dried cranberries
1/2 cup chocolate chips


Directions:
Preheat oven to 350F. Line cookie sheet with parchment paper.
In a large bowl, combine flour, sugar, baking powder, and baking soda. Add eggs one at a time, beating at low speed with an electric mixer. Mix in vanilla extract. Add dried cranberries and chocolate chips and stir to combine.
Divide batter into two, and shape each one on a cookie sheet into a rectangular log, about 15 inches long and 2 inches wide. 
Bake for 30 minutes, until edges are golden brown; cool on a wire rack until warm to the touch. Transfer logs onto a cutting board and slice diagonally into 1/4-inch thick cookies. 
Arrange back on parchment lined cookie sheet and bake for 8 to 20 minutes, depending on how crisp you want them.
Cool completely on wire rack.


Enjoy!

Wednesday, September 21, 2011

Rosy Apple Tart


My view of apples have changed so many times during my life.
At first, when I was about 3 years old, apples were like 'my dad's fruit', because he used to pick apples for me and my sister from apple trees every weekend. We would eat them on the spot, dripping apple juice all over ourselves, munching them down happily. 

Then, I started to like strawberries, and my love for apples slowly diminished. I thought apples were too hard, and my mom insisted on eating the peels as well, even though I hated them. 

But then I came to America, and I discovered millions of different varieties of apples that I could buy, and I was amazed. 
Gala, fuji, honeycrisp, grannysmith, red delicious...
It was ridiculous! (in a good way)
So I just HAD to try all the apples that I could find in stores, and I started to love apples again! Fuji apples are by far my favorite apples to snack on, and honeycrisp apples for baking.

Then there was a time when I was obsessed about restricting myself from sugar because I found out that my grandfather had diabetes, so I simply didn't eat any fruits at all, except tomatoes (is that a fruit?). 
But now, I LOVE fruits! I still try not to overeat them, but I tend to use them a lot for baking, and apples are especially versatile, so they're back on my 'like' list again:)

This rosy apple tart tastes just as good as it looks. I'm sure a lot of you will be able to make it way prettier than mine, and mine's not exactly perfect, but you get the idea, right?
It's supposed to resemble a rose garden, the rolled apple peels being the roses, and the chopped pistachios being the umm... green background:)
Anyways, I had a little trouble with the roses, so it didn't turn out as beautiful as I had hoped it would, but it tasted DIVINE, and that was enough for me. For now. 

Oh, FYI, this is tart doesn't have the best crust in the world, but it works for me. It's more like a crumbly crust rather than a flaky one, so you might want to use another tart shell recipe if you like flaky crusts.


Rosy Apple Tart
makes 1 9-inch tart
Ingredients:
For the Crust:
40g/1.5 oz ground almonds (almond flour)
100g/3.5 oz cake flour
40g/1.5 oz powdered sugar
1/3 tsp baking powder
60g/2 oz unsalted butter

1/2 egg


For the Almond Filling:
160g/5.7 oz ground almonds
110g/3.5 oz powdered sugar
120g/4 oz unsalted butter, softened
2 eggs
2 egg yolks
2-3 drops vanilla essence


For the Apple filling:
2-3 large apples, peeled without breaking, peels reserved
2 tsp ground cinnamon
2 tbsp honey
1/4 cup granulated sugar


For the Roses:
4 large apples 
1 cup salted and roasted pistachios, in shell, coarsely chopped
1/4 of Almond Filling


Directions:
For the crust:
In a large bowl, or in a food processor, combine flour, ground almonds, powdered sugar, and baking powder, or pulse a few times. Put in butter and eggs into bowl or food processor, and cut into the flour with two knifes or a pastry blender, or pulse until mixture forms a ball. Wrap dough in plastic wrap and chill for 2 hours in refrigerator. 
Roll chilled dough into a 10-inch circle and fit into the tart pan. Prick many holes in the bottom with a fork, and bake in a preheated 320F oven for 20 minutes.
Let cool completely.
For the Almond Filling:
Cream butter with powdered sugar in a mixing bowl with an electric mixer. Gradually add eggs and egg yolks, and beat in vanilla essence. Stir in ground almonds with a spoon or a  spatula. Reserve 1/4 of the filling in a ziploc bag, for garnish.
For the Roses:
Halve 6 apples (including the ones for the filling AND the roses) horizontally. Peel apples with a paring knife, peeling around the apples without breaking it. Lay them out nice and long on a baking sheet and bake in a preheated 350F oven for 4 minutes. Cut off small corner of the ziploc bag and pipe reserved almond filling along the apple peels.
Roll them up to make them look like roses, and secure with rubber bands. 
For the Apple Filling:
Chop apples (they should be already peeled, since you made the roses with them) finely and toss with the rest of the apple filling ingredients in a large saucepan. Cook over medium-low heat until softened.
To finish:
Spread almond filling on cooled tart shell. Spread the apple filling on top. Arrange the roses on the apples after taking the rubber bands off; press down to secure. Bake in a preheated 350F oven for 30-35 minutes.
Sprinkle chopped pistachios on top to make a green garden.


Slice and enjoy!


The Moistest Blueberry Crumb Cake.. EVER.


I love Martha Stewart's recipes. 
Her recipes almost always guarantee success, so I browse her website practically everyday. Once I start browsing, I just can't stop. The list seems to go on forever, and there are loads of creative recipes that I've never even thought of.
But of course, there are plenty of classic ones that bring me a feeling of 'home, sweet, home', and this blueberry crumb cake is definitely one of them.

This cake is the yummiest, the moistest, and the most tender crumb cake I have ever baked. 
Usually, when I bake things in a square pan, the edges become a little firmer than the inside, but this cake is moist and tender right until the very edge of it. When I hold it in my hands, they kind of feel marshmallow-y and very soft, and they almost fall apart because of their tenderness. The streusel crumbs on top have a very slight crunch, but they're still on the softer side. And they don't even have a lot of butter in them! But don't get me wrong. It is NOT over-tender.
I have tried this recipe 3 times, each with cherries, blueberries, and peaches, and all of them turned out absolutely amazing. This is going into my 'best recipes' file, and I highly recommend you try it out too:)


Blueberry Crumb Cake
recipe adapted from Martha Stewart
Ingredients:
For the Cake:
4 tbsp unsalted butter
1+1/2 cup all purpose flour
1+1/2 tsp baking powder
1/2 tsp baking soda
1/4 tsp salt
1/8 tsp ground cinnamon
1/8 tsp ground nutmeg
3/4 cup granulated sugar
1 egg
2/3 cup milk
1/2 tsp lemon juice
1+1/2 cup fresh blueberries
1 tsp all purpose flour (for coating blueberries)

For the Streusel Topping:
1 cup all purpose flour
1/2 cup brown sugar, packed
1/4 tsp salt
1/2 cup unsalted butter

Directions:
Preheat oven to 350F. Line a 9-inch square pan with parchment paper.
For the Streusel Topping:
In a medium bowl, stir together flour, brown sugar, and salt. Cut in the butter with your hands or a pastry blender until large, moist crumbs form. Chill. 
For the Cake:
Combine milk and lemon juice.
In a medium bowl, whisk together flour, baking powder, baking soda, salt, cinnamon, and nutmeg. In a large bowl, beat the butter and granulated sugar with and electric mixer until fluffy. Add egg; beat well. Add flour mixture and milk mixture alternately until just combined. In a large bowl, toss the blueberries with 1 tsp of flour. Fold into the batter; spoon into prepared pan.
Sprinkle cake with streusel topping. Bake until golden brown and a toothpick inserted in the center comes out clean, about 30 minutes. Let cool completely. Cut into squares.

Enjoy!