Showing posts with label moist. Show all posts

Monday, March 19, 2012

Super Moist Honey Cake


Here's a super moist cake for you all.
It's actually a quick bread, but it is extra moist and tender, almost like a cupcake:)
As soon as I saw this recipe, I knew I had to make it.
It's not the prettiest thing in the world, but I can tell you that you'll want to bake it over and over again!
Basically, it's a spice cake, but with a surprise of a distinctive honey flavor.
The honey taste is definitely there, which is perfect for me because I adore honey.
I was planning to have these with a drizzle of honey, but I don't even think that was necessary!
These are perfect for breakfast, a quick snack, or even as a dessert.


Super Moist Honey Cake
makes one 9x5" loaf
Recipe adapted from SmittenKitchen
Ingredients*
1 cup plus 2 1/2 tablespoons all purpose flour
1 teaspoon baking powder
1/3 teaspoon baking soda
1/6 teaspoon salt
2 teaspoons cinnamon
1/6 teaspoon ground cloves
1/6 teaspoons ground nutmeg
1/3 cup olive oil
1/3 cup honey
1/2 cup granulated sugar
1/6 cup (2 tablespoons plus 2 teaspoons) brown sugar
1 egg, room temperature
1/3 teaspoon vanilla extract
1/3 cup warm coffee
1/6 cup (2 tablespoons plus 2 teaspoons) fresh orange juice
1 tablespoon plus 1 teaspoon rye or whiskey ( I just used water - worked fine!)

Directions:
Preheat oven to 350F.
Generously grease 9x5" loaf pan with baking spray.
In a medium bowl, combine the flour, baking powder, baking soda, salt, cinnamon, cloves and nutmeg. Make a well in the center and add oil, honey, both the sugars, eggs, vanilla, coffee, orange juice, and ryr or whiskey (or water). I have learnt from this recipe that if you meaure the oil first, then the honey, the honey will slide out beautifully without leaving any sticky bits behind! With an electric mixer on low speed, stir together all the ingredients until well combined. Pour batter into the prepared pan. Bake until the cake springs back when you gently touch the center, about 45 to 55 minutes. Let the cake stand for 15 minutes before removing from pan.

*I know the ingredients measurements are a little strange, and that's because I divided the original recipe by three! If you want to, you can bake 3 loaves with the following amounts:
3 1/2 cups all purpose flour
1 tablespoon baking powder
1 teaspoon baking soda
1/2 teaspoon salt
4 teaspoons cinnamon
1/2 teaspoon ground cloves
1/2 teaspoon ground nutmeg
1 cup olive oil
1 cup honey
1 1/2 cups granulated sugar
1/2 cup brown sugar
3 eggs, room temperature
1 teaspoon vanilla extract
1/2 cup fresh orange juice
1/4 cup rye or whiskey


Thursday, March 15, 2012

The Best Red Velvet Cheesecake Cake ever.


I guess the red velvet trend is starting to die out now, but red velvet is still unquestionably many people's favorite flavor.
I'm not so sure that I would be able to recognize the taste of red velvet in a blind taste testing; maybe it's just the color that makes it alluring to our taste buds, as well as our eyes.
But seriously, there's like twenty red velvet recipes in my "to try" list because they all looked so tempting!
Red velvet whoopie pies, red velvet cookies, red velvet cupcakes, red velvet cake balls... you name it!
This one was the only recipe I've tried so far, and it's definitely an good start!
No, it's actually an AMAZING start.
A whole layer of rich and creamy cheesecake stuffed inside two moist, thick, and delicious layers of red velvet cake.
Covered with decadent cream cheese frosting.
Topped with shavings of white chocolate love.

Mmm... what more could you ask for?


Red Velvet Cheesecake Cake
recipe adapted from recipegirl

Makes one amazing 9-inch 3-layer cake
Ingredients:
For the Cheesecake:
Two (8-ounce) packages cream cheese, at room temperature
2/3 cup granulated white sugar
pinch of salt
2 large eggs
1/3 cup sour cream
1/3 cup heavy whipping cream
1 teaspoon vanilla extract

For the Red Velvet Cake:
2 1/2 cups all purpose flour
1 1/2 cups granulated white sugar
3 tablespoons unsweetened cocoa powder (not Dutch process)
1 1/2 teaspoons baking soda
1 teaspoon salt
2 large eggs, at room temperature
1 cup melted butter
1/2 cup vegetable or canola oil
1 cup buttermilk
1/4 cup (two 1-ounce bottles) red food coloring
2 teaspoons vanilla extract
2 teaspoons white vinegar

For the Cream Cheese Frosting:
1 cup powdered sugar, sifted lightly to remove any lumps
Two (8-ounce) packages cream cheese, at room temperature
1/2 cup unsalted butter, at room temperature
1 tablespoon vanilla extract

Directions:
1. Prepare the cheesecake layer: Preheat oven to 325 degrees F. Place a large roasting pan on the lower third rack of the oven. Place a kettle of water on the stove to boil. Spray a 9-inch springform pan with nonstick spray and line the bottom with a round of parchment paper. Wrap a double layer of foil around the bottom and up the sides of the pan (you want to seal it so the water from the water bath doesn't seep into the pan). In a large bowl, use an electric mixer to mix the cream cheese- blend until it is nice and smooth and creamy. Mix in sugar and salt and blend for 2 minutes, scraping down sides of the bowl as needed. Add eggs, one at a time, blending after each addition. Finally, mix in sour cream, whipping cream and vanilla. Mix until smooth. Pour the batter into the prepared pan. Set the pan into the roasting pan in the pre-heated oven. Carefully pour the hot water from your kettle into the roasting pan (it will fill the pan surrounding the cheesecake). Pour enough water so that there is about an inch of water coming up the foil along the sides of the cheesecake pan. Bake the cheesecake for 45 minutes. It should be set to the touch and not jiggly. Remove the cheesecake from the roasting pan and let it cool on a wire rack for at least an hour. When it has cooled, place the pan into the freezer and let the cheesecake freeze completely. This can be done in several hours- or overnight.

2. Prepare the cake layers: Preheat oven to 350 degrees F. Grease and flour two 9-inch round metal baking pans (or spray with nonstick baking spray with flour). In a large bowl, whisk together flour, sugar, cocoa powder, baking soda and salt. Add eggs, melted butter, oil, buttermilk, food coloring, vanilla and vinegar to the flour mixture. Using an electric mixer on medium-low speed, beat for 1 minute, until blended. Scrape sides and bottom of bowl with a rubber spatula. Beat on high speed for 2 minutes. Spread the batter evenly into the prepared pans, dividing equally. Bake 25 to 30 minutes or until a toothpick inserted in the center comes out with a few moist crumbs attached. Let cool in pans on a wire rack for 10 minutes. Run a knife around the edge of the pans, then invert cakes onto a rack to cool completely.

3. Prepare the frosting: In a large bowl, using an electric mixer on medium-high speed, beat powdered sugar, cream cheese, butter and vanilla until it is smooth and creamy (do not overbeat).

4. Assemble the cake: Place one cake layer into the center of a cake plate or platter. Remove the cheesecake from the freezer, take off the sides of the pan, and slide a knife under the parchment to remove the cheesecake from the pan. Peel off the parchment. Measure your cheesecake layer against the cake layers. If the cheesecake layer turns out to be a slightly larger round than your cake, move it to a cutting board and gently shave off some of the exterior of the cheesecake to get it to the same size as your cake layers. Place the cheesecake layer on top of the first cake layer. Place the 2nd cake layer on top of the cheesecake.

5. Frost the cake: Apply a crumb coat layer to the cake- use a long, thin spatula to cover the cake completely with a thin and even layer of frosting. Be sure to wipe off your spatula each time you are about to dip it back into the bowl to get more frosting (this way you won't be transferring any red crumbs into the bowl of frosting). Don't worry at this point about the crumbs being visible in the frosting on the cake. When your cake has a thin layer of frosting all over it, place it into the refrigerator for 30 minutes to "set" the frosting. Once the first layer of frosting is set, apply the 2nd layer. Start by adding a large scoop of frosting onto the top of the cake. Use a long, thin spatula to spread the frosting evenly across the top and then spread it down the sides of the cake too. Because you applied a crumb-coat layer, you shouldn't have any red crumbs floating around in the final frosting layer. Decorate, as desired. I recommend white chocolate shavings (see *Tips below). Keep this cake refrigerated.

Tips:
*For making white chocolate shavings: Purchase a hunk of white chocolate. Microwave the chocolate to soften it up slightly (15 to 30 seconds, depending on the size). Use a potato peeler to run down the side of the chocolate to create shards/shaves/curls of white chocolate. I like to shave it onto a paper plater and then just use the plate to slide the chocolate onto the top of the cake.
*If you are serving this cake at a party, it's perfectly okay to leave the cake at room temperature for an hour or so while serving. Otherwise, keep it in the refrigerator. It also freezes perfectly! I made my cake one day and then just placed it as-is in the freezer and pulled it out the next day. It thaws quickly.
*The original recipe uses 2 1/2 cups powdered sugar for the frosting, but my family doesn't like crazy sweet stuff, so I reduced the amount drastically. 1 cup was still very sweet for us!


Tuesday, March 13, 2012

Super moist banana snack cake


I don't usually make the same recipe more than once, because I like variety, but this is one of the very, very, few recipes that I call my "go-to" recipe. 
These are bomb.
They are the most tender banana breads you will ever have.
So tender that I called it a cake rather than a bread.
They have a wonderful, deep banana flavor, and literally, they MELT IN YOUR MOUTH.
Oh, and you wanna know something even better?
They freeze beautifully.
Simply wrap each piece in plastic wrap, freeze 'em, and thaw in the refrigerator when you feel like snacking! 
20 seconds in the microwave is all it takes for a "freshly baked" banana cake :)


Super Moist Banana Snack Cake
recipe from Cooking light
serves 12
Ingredients:
6 3/4 oz all-purpose flour (about 1 1/2 cups - spooned and leveled)
1/3 cup sugar
1 tsp baking powder
1 tsp baking soda
1 tsp ground cinnamon
1/4 tsp salt
1 cup plain low-fat yogurt
3/4 cup mashed ripe banana (about 1 1/2 medium bananas)
1/4 cup vegetable oil (I used safflower)
1 large egg, lightly beaten.
cooking spray
1/2 cup cool whip (optional)

Directions:
Preheat oven to 375F.
Combine flour, sugar, baking powder, baking soda, cinnamon, and salt in a large bowl; stir with a whisk.
In a small bowl, combine yogurt, banana, oil, vanilla and egg; stir until well blended. Add yogurt mixture to the flour mixture in the large bowl, stirring just until moist.
Pour the batter into a 9-inch square metal baking pan coated with cooking spray. Bake at 375F for 15-20 minutes or until a wooden pick inserted in the center comes out clean. Cool cake in the pan 10 minutes on wire rack; remove from pan. Cool completely on wire rack. Serve with whipped topping, if desired. (Since the cake was so moist and tender, I found that it didn't even need a topping!)


See how tender that is?


Monday, October 17, 2011

Betty Crocker's Jumbo Chocolate Chip Cookies


I'm trying to get the perfect chocolate chip cookie these days, so I've already tried about four different recipes just last week. 
One of them was the turtle cookies I posted a few hours ago, which was awesome, but that technically wasn't a chocolate chip cookie, and they had nuts in them.
This one's more of a pure, classic version:)
Of course, they're huge, soft, thick, moist, and chewy - just how I like'em!
I usually try to underbake my cookies so that there's a little cookie doughy bit inside:)))
And these cookies certainly gave me that!


Jumbo Chocolate Chip Cookies
makes 1 1/2 dozen 5-inch cookies
Recipe from Betty Crocker's New Cookbook
Ingredients:
3/4 cup granulated sugar
3/4 cup packed brown sugar*
1 cup butter, softened
1 egg
2 1/4 cups all purpose flour**
1 teaspoon baking soda
1/2 teaspoon salt
2 cups semisweet chocolate chips

Directions:
Preheat oven to 375F.
Mix sugars, butter, and egg in a large bowl. Stir in the flour, baking soda and salt.
Stir in the chocolate chips. Drop dough by 1/4 cupfuls onto an ungreased cookie sheet, leaving 3 inches between cookies.
Bake 12 to 15 minutes or until edges are set but the center is still soft. Let the cookies cool for about 2 minutes on the cookie sheet, then transfer to wire racks and cool completely.

Notes:
*I used splenda brown sugar blend, just to make it a little healthier:)
**I used 2 1/4 cups of self rising flour and omitted the baking soda and salt.
For regular sized cookies, drop by heaping tablespoons about 2 inches apart and bake for 8 to 10 minutes. Makes about 4 dozen.


Monday, September 26, 2011

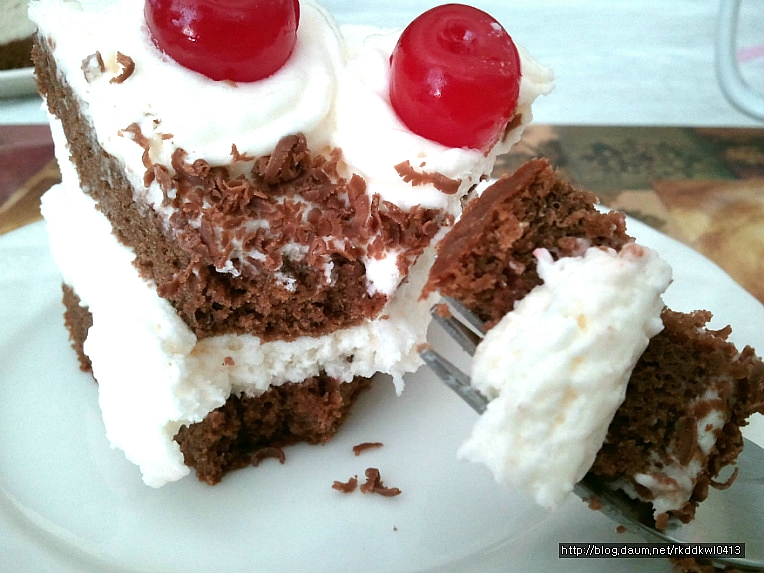
Swiss Black Forest Cake


Let me get straight to the point.
This cake is heavenly.
The chocolate cake layers are incredibly moist, and the filling is so creamy and light, you almost feel nothing at all. 
I think this cake makes a wonderful gift for any occasion.
I baked mine for my mom's birthday a few months ago, and everyone absolutely ADORED it.
Especially because it was baked in a 7-inch pan, it was perfect for a 'leftovers-free' birthday cake! My mom hates having large cakes and pies in the refrigerator because it takes up so much space, so she always tries to slice'em up and store them in a small container.
But I hate doing that, because if I store it that way, the cake gets all out of shape and it loses so much frosting in the process of putting it in and out of containers!
That's why I usually bake smaller cakes - so that we can finish it on the spot:)


Swiss Black Forest Cake
Recipe adapted from hotpolkadot
Makes one 7-inch cake
Ingredients:
For the Cake:
3 ounces semisweet chocolate, chopped
6 tablespoons boiling water
3 eggs
6 tablespoons granulated sugar
6 tablespoons cake flour (or substitute)
For the filling:
7 g/0.25 oz powdered gelatin
1/4 cup water
3 cup whipped cream (I used cool whip)
3 tbsp granulated sugar
1 1/2 tsp vanilla
1-15 oz can pitted maraschino cherries, drained, syrup reserved
3 tbsp spiced rum
For Garnish:
1 ounce semisweet chocolate, grated or shaved
12 pitted maraschino cherries


Directions:

Preheat the oven to 350 degrees. Butter and flour a 7-inch spring form pan and set it aside.
In a small heavy sauce pan combine the chopped chocolate and water then bring it to a slow boil over low heat, stirring constantly. Remove it from the heat once it thickens to a pudding consistency and stirring leaves temporary lines in the surface. Set it aside and let it cool to room temperature.
In a large bowl with an electric mixer and the whisk attachment beat the eggs and sugar until they triple in volume. Gently but quickly fold in the cake flour half at a time until it's just incorporated. Next fold in the cooled chocolate mixture.
Pour the batter into the pan and bake for 23 - 28 minutes until a toothpick inserted into the middle comes out clean. The top of the cake will rise while baking then lower slightly when it's done and feel springy to the touch. The sides will also shrink as they pull away from the pan.
Transfer the pan to a cooling rack and allow it to sit for 10 – 15 minutes before releasing the cake from the spring form to cool completely.
While the cake is cooling, make the filling. In a medium bowl combine whipped cream and sugar. In a small heatproof bowl combine the gelatin and water. Let it soften for about 5 minutes then place the bowl in a pan of simmering water, stirring occasionally, until the gelatin is dissolved. Set the gelatin mixture aside and let it reach room temperature, then add it slowly to the whipped cream. Stir in vanilla extract.
Drain the can of cherries and reserve the syrup. Set aside 12 cherries to top the cake later. With a cake leveller or a long serrated knife level off the top of the cooled Chocolate Génoise Cake and slice it into 2 even layers and put one into a mousse ring/springform pan, or wrap it around with parchment paper. In a small bowl combine the reserved cherry syrup and spiced rum then drizzle it evenly over each cake layer. Spoon in 3/4 of the filling and push in the drained cherries. Top with the remaining cake layer and spread half of the remaining filling over it. Pipe rosettes around the cake with a piping bag and top each with a cherry. You can keep the stems on if you'd like, but I didn't have enough pretty cherries with stems, so I just took them all out:)


Wednesday, September 21, 2011

The Moistest Blueberry Crumb Cake.. EVER.


I love Martha Stewart's recipes. 
Her recipes almost always guarantee success, so I browse her website practically everyday. Once I start browsing, I just can't stop. The list seems to go on forever, and there are loads of creative recipes that I've never even thought of.
But of course, there are plenty of classic ones that bring me a feeling of 'home, sweet, home', and this blueberry crumb cake is definitely one of them.

This cake is the yummiest, the moistest, and the most tender crumb cake I have ever baked. 
Usually, when I bake things in a square pan, the edges become a little firmer than the inside, but this cake is moist and tender right until the very edge of it. When I hold it in my hands, they kind of feel marshmallow-y and very soft, and they almost fall apart because of their tenderness. The streusel crumbs on top have a very slight crunch, but they're still on the softer side. And they don't even have a lot of butter in them! But don't get me wrong. It is NOT over-tender.
I have tried this recipe 3 times, each with cherries, blueberries, and peaches, and all of them turned out absolutely amazing. This is going into my 'best recipes' file, and I highly recommend you try it out too:)


Blueberry Crumb Cake
recipe adapted from Martha Stewart
Ingredients:
For the Cake:
4 tbsp unsalted butter
1+1/2 cup all purpose flour
1+1/2 tsp baking powder
1/2 tsp baking soda
1/4 tsp salt
1/8 tsp ground cinnamon
1/8 tsp ground nutmeg
3/4 cup granulated sugar
1 egg
2/3 cup milk
1/2 tsp lemon juice
1+1/2 cup fresh blueberries
1 tsp all purpose flour (for coating blueberries)

For the Streusel Topping:
1 cup all purpose flour
1/2 cup brown sugar, packed
1/4 tsp salt
1/2 cup unsalted butter

Directions:
Preheat oven to 350F. Line a 9-inch square pan with parchment paper.
For the Streusel Topping:
In a medium bowl, stir together flour, brown sugar, and salt. Cut in the butter with your hands or a pastry blender until large, moist crumbs form. Chill. 
For the Cake:
Combine milk and lemon juice.
In a medium bowl, whisk together flour, baking powder, baking soda, salt, cinnamon, and nutmeg. In a large bowl, beat the butter and granulated sugar with and electric mixer until fluffy. Add egg; beat well. Add flour mixture and milk mixture alternately until just combined. In a large bowl, toss the blueberries with 1 tsp of flour. Fold into the batter; spoon into prepared pan.
Sprinkle cake with streusel topping. Bake until golden brown and a toothpick inserted in the center comes out clean, about 30 minutes. Let cool completely. Cut into squares.

Enjoy!


Sunday, September 18, 2011

Moist Cocoa Brownies


I'm so into brownies these days. 
For the last few months, I've been obsessed with cakes covered in whipped cream, so I had them practically everyday. I'm still not over it, but two weeks ago, this amazing book of brownies caught my eye.
It was full of awesome bars, brownies, and blondies recipes, and I just HAD to buy it.
Plus it was on a clearance sale!
I've tried three of the recipes so far, and all of them turned out great.
This was my first brownie from the book, and it's moist and chocolatey, with some crunchiness from a handful of nuts; it's just like the classic, most basic brownies you can ever bake.


Moist Cocoa Brownies
Recipe very closely adapted from Good Housekeeping: Brownies
Makes 16 squares
Ingredients:
2 eggs
1/2 cup unsweetened cocoa powder
1 cup granulated sugar
1 cup chopped nuts (I used pecans)
1/2 cup all purpose flour
1/2 cup unsalted butter
1 teaspoon vanilla extract

Direction:
Preheat oven to 350F. 
Combine flour and cocoa powder in a medium bowl.
Melt butter in a small saucepan over low heat; remove from heat and stir in sugar. Once the sugar is dissolved, mix in eggs, then stir in vanilla extract. Stir in flour-cocoa mixture and mix until moistened. Stir in chopped nuts and pour batter into a 9-inch square pan lined with foil. Bake for 17 minutes, or until a toothpick inserted in the center comes out with a few moist crumbs. Cool in pan for 5 minutes, then on a wire rack, until completely cooled. Cut into 16 squares. You can dust some powdered sugar on top just before serving, but to me it tastes gorgeous even without it:)

Enjoy!


Tuesday, September 13, 2011

Mini Raspberry Heart Cakes


Have you ever tasted a chocolate cake and had an irresistible urge to gobble down the whole thing?
I have.
And it's this cake right here.
And you can't even go for the rest of the cake because it is "portion controlled".
Hmm.. I say this cake is good for your waistline.

It's incredibly moist and soft, it practically melts in your mouth. I actually made this for my mom, who recently had a dental surgery, so that she could enjoy her food without having to bite into it too hard.
Of course, she enjoyed it too, but she said that the doctor told her to avoid sweet stuff.
Oops...I forgot about that. Silly me:)
So I ended up eating the whole batch with my dad!

I got this recipe from the Hershey's website, which has the most amazing chocolate cake photos EVER. Once I start looking at all the chocolatey treats, I sit in front of my computer drooling at them for at least 3 hours. I had a very hard time choosing which one to make, so I chose one that didn't yield a lot of servings. Just to experiment. This one was a recipe for two, but I doubled it and made four lovely mini chocolate cakes:)


Chocolate Sweetheart Cakes for Two

Recipe from HERSHEY'S 
Ingredients:

For the Cake:
3/4 cup all-purpose flour
1/4 cup packed light brown sugar
1/2 teaspoon baking soda
1/2 cup water
1/2 teaspoon white vinegar
1/4 cup granulated sugar
3 tablespoons unsweetened cocoa powder
1/8 teaspoon salt
3 tablespoons vegetable oil
1/2 teaspoon vanilla extract

For the Chocolate Frosting:
1 tablespoon butter or margarine
2/3 cup powdered sugar
1 tablespoon unsweetened cocoa powder
2 to 3 teaspoons milk
1/8 teaspoon vanilla extract

Garnish:
4 raspberries
Fresh mint leaves
Caramel syrup (optional - I used smucker's sugar free caramel syrup)

Directions:
Heat oven to 350F. Grease and flour a 8-inch square baking pan.
Stir together flour, granulated sugar, brown sugar, cocoa powder, baking soda and salt in a medium bowl. Add water, oil, vanilla, and vinegar; beat with spoon or whisk until smooth. Pour batter into prepared pan.
Bake 18 to 20 minutes or until wooden pick inserted in the center comes out clean. Cool 10 minutes; remove from pan to wire rack. Cool completely. Transfer to cutting board. Using a 3-1/4-inch heart shaped cookie cutter, cut cake into 4 hearts. Spread chocolate frosting on top of two hearts. Press remaining hearts on top. Drizzle with caramel syrup, if desired, then garnish with raspberries and mint leaves.

For the Chocolate Frosting: Place butter in a small microwave safe bowl. Microwave at medium (50%) 20 seconds or until butter is melted. Stir together powdered sugar and cocoa; add to butter mixture alternately with milk, beating with spoon or whisk until smooth. Stir in vanilla. Makes about 1/3 cup frosting.